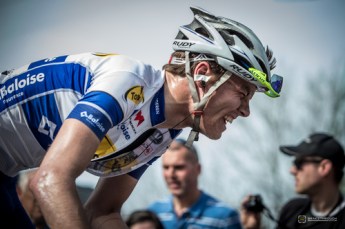
 Tony Martin won the UCI World Time Trial Championship in 2011, 2012 and 2013, and is the odds on favorite to win it again this year. He is an incredible bike rider and by all accounts an incredibly nice guy; he once caught and passed David Millar in a time trial and apologized to Millar as he went by. The picture is of Martin time trialing in full aerodynamic mode at the 2013 Criterium du Dauphine which is an eight-day race that Martin won on the basis of the insurmountable lead he built by winning the time trial.
If you want to minimize air resistance and drag as much as possible, you ride like Martin rides in a time trial. Unfortunately, this is beyond the reach of many riders for a number of reasons. First, it’s expensive. Between his bike frame, wheel set, skin suit, helmet, etc., Martin is moving well over $10K worth of gear in the photo. Next, an optimized 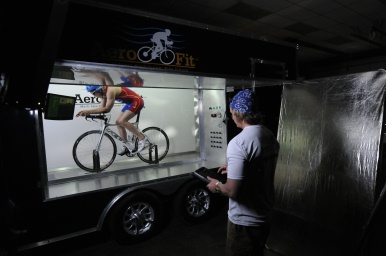 aerodynamic position is difficult to accomplish. Differences in body mass and shape mean that the position that optimizes both aerodynamics and power output is different for every rider. Finding that position takes hours of iterative testing and refinement in a wind tunnel. In addition, a full aerodynamic tuck is difficult to maintain and usually takes many hours of practice to be able to hold for any length of time. Simply strapping a set of aerobars unto your bike isn’t going to do it. Finally, riding in an optimal aerodynamic position is difficult. The position is uncomfortable and the bike is more difficult to control when you’re stretched out on aerobars.
Although going full aero involves a significant investment of time, effort and money, there are a number of simple things you can do that will reduce air resistance and drag that are relatively easy and are either free or cost the price of a new jersey. Taken individually, none of these things will result in a huge reduction in air resistance but small things add up and they can make a noticeable difference over a long ride.
Get Low
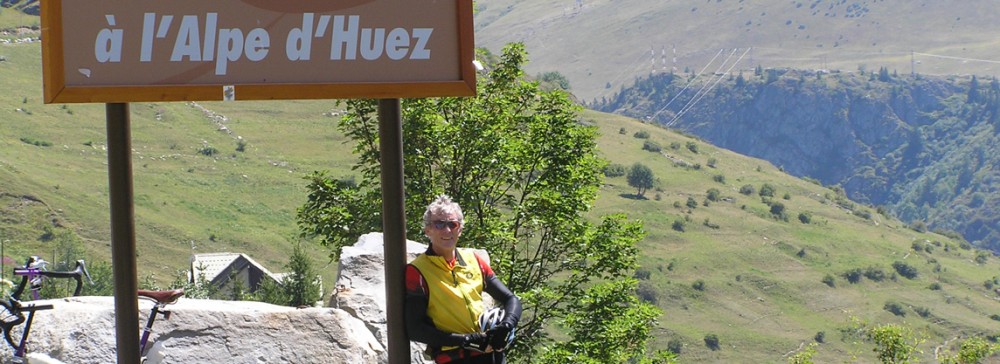
The biggest single thing you can do to reduce air resistance without spending any money is to reduce the surface area on the front of your body that is exposed to the wind as you ride forward. It’s easy to do and you don’t need aerobars to do it. Bend at the waist and lean forward. The lower you get the better off you’ll be but almost any degree of forward lean will reduce the area of your torso that is exposed to the wind.
 This is easiest to do if you have road handlebars on your bike. Moving your hands from a position on the flat upper bar on either side of the stem to the brake hoods will bring you down a little bit. Keeping your hands on the hoods and bending your elbows will bring you down more. You can get fairly low with your hands on the brake hoods by bending your elbows to the point where you’re resting your forearms on the handlebars like the rider in the picture. You can usually get even lower by riding with your hands on the drops.
Elbows and Knees
 While the exact elbow position for optimal aerodynamic riding depends on the rider’s body size and shape, it’s generally the case that tucking the elbows in is better than bending them out. Many riders, however, tend to bend their elbows out in a variety of circumstances. When you bend at the waist and lean forward to get low, make sure to pull your elbows in rather than bend them out. People also tend to bend their elbows out when they are leaning into a climb, working hard to maintain a strong tempo, gripping the bars tightly, or are just tired. Pay attention to where your elbows are and if they are flaring wide, bring them in.
Knee position is an aerodynamic factor that people sometimes miss because it’s usually not obvious in pictures of riders who are time trialing. Take a look at where your knees are relative to your body while you’re pedaling. If your knees are spread open so that they form a V-shape with your body, your legs are funneling air into your body and increasing the air resistance and drag you have to overcome. Ride with your knees pulled in toward the top tube on your bike. Obviously, you don’t want your knees banging into the top tube but closer to the tube is better than further away. When you do this, don’t accomplish the “knock-kneed” position by flaring your ankles out.
Your Jersey
Wear a tight jersey. If your jersey is loose or baggy, it is catching the wind and increasing air resistance by acting like a sail that is pulling you in the opposite direction. Don’t worry about what you look like. How you look in your exercise clothes may be a big deal for gym bunnies but for riders the big deal is how smart and how well you ride. If you’re overweight, you’re overweight; there are things you can do to change that but wearing a loose jersey isn’t one of them. Don’t worry about it. Ride smart.
 Keep your jersey zipped up. Partially unzipping a jersey allows air to circulate around the upper body to the back where it is trapped by the jersey. It’s like strapping a sail facing the wrong direction on your bike. You would think this would be a no-brainer but you see riders all the time from beginners to pros who have expensive aero gear on their bike and who are trying to go fast with their jersey partially unzipped.
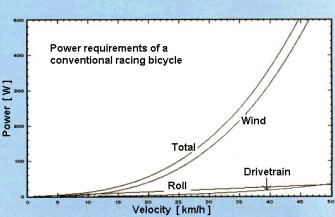
 The graph discussed in Aerodynamics Part 1 illustrates that air resistance is negligible when you are going slow but it quickly ramps up with velocity until it becomes the overwhelming force you have to overcome to move your bike forward. While all of the tips and techniques offered in this post have a small effect in reducing air resistance they are all easy to do. They are also either cost-free or cost, at most, the price of a new jersey. Small benefits add up and their combination can make the difference between a ride that is exhausting and a ride that is exhilarating.


